Friday, 22 December 2017

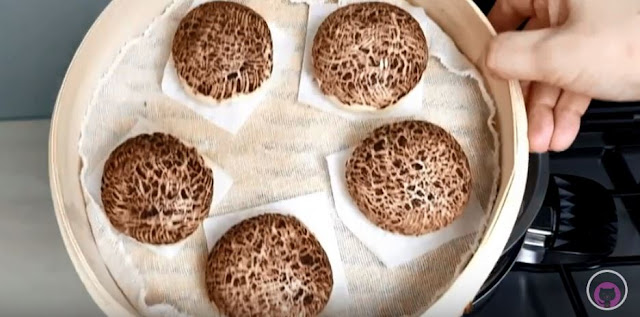
蘑菇做型牛奶饅頭 How to Make Mushroom Shaped Steam Bun

蘑菇做型牛奶饅頭 - 手工饅頭
How to Make Mushroom Shaped Steam Bun - Homemade Steam  Mantou

在香港的酒樓吃到蘑菇做型的饅頭點心,覺得非常特別, 回家後急不及待要試做。雖然做得不及酒樓師傅的那麼好,但效果也算不錯!!
Tired the mushroom shaped steam bun in a Hong Kong restaurant. I'm so eager to try to make the steam bun by myself when I am back home. Although they are not as good as the one that cooked by the restaurant's chef, my steam buns are not bad though!


YouTube Video視頻:


Lazy Mom and Busy Dad [美味生活] 美味名人食譜網址:https://bit.ly/2Kn1m85
美味生活網址:https://bit.ly/2tM464J


材料:

180g 中筋面粉

30g細砂糖 
100毫升牛奶(30°C)
5毫升植物油
2g 快速酵母
5g 可可粉
15g 水

Ingredients:

180g Plain Flour 
30g Caster Sugar
100ml Milk (30°C)
5ml Vegetable Oil
2g Instant Yeast
5g Cocoa Powder 15g Water

做法:

1.  酵母加入牛奶中, 加一茶匙糖拌匀
2.  等大約5 - 8 分鐘至酵母有氣泡
    * 這個步驟可確定酵母沒有變壞


3.  加入麵粉, 糖, 牛奶, 油和酵母
4.  打12 -15分鐘至成長條狀 


5.  把麵團揉成長條狀 


6.  麵團分割成8 - 9 份每份30g 


7.  留—份麵團做蘑菇柄
8.  每份麵團揉 20 - 25次至光滑 


9.  壓出空氣把麵團揉成球狀 (重複兩次) 


10.  收口朝下放在饅頭紙上 


11.  可可粉加入水拌匀 


12.  輕輕在麵團表面塗上可可粉漿 


13.  小份麵團分割成 8 - 9小份每份4g
14.  把麵團揉成水滴狀 


15.  將麵團放入蒸籠裡發酵30 - 40分鐘至兩倍大 


16.  用凍水 中火蒸20分鐘 
17.  蒸好後待五分鐘才開蓋 


18.  剪開饅頭底部,把蘑菇柄放入 


[美味生活] How Living – Lazy Mom and Busy Dad  美味名人食譜  :  https://goo.gl/hps49R


Methods:

1.  Add the yeast into the warm milk and water, add 1 tsp sugar and stir
2.  Let the mixture stand for about 5 to 8 mins till the yeasts swell and foam
      *This is a crucial step to ensure the yeast is alive
3.  Add flour, sugar , milk, oil and yeast
4.  Knead 12- 15 mins until a dough is formed
5.  Shape the dough into a rectangular strip
6.  Divide the dough it into 8 - 9 pieces , 30g each
7.  Keep 1 piece of dough to make the mushroom stems
8.  Knead each dough 20 - 25 times until it becomes smooth
9.  Press out the air and shape the dough into a round ball (repeat two times)
10.  Place on the parchment paper with seam side down
11.  Mix the cocoa powder with water
12.  Bush the cocoa mixture slightly on the surface of the dough
13.  Add another 8 - 9 small pieces, 4g each
14.  Shape the small dough into a water drop shape
15.  Put into the bamboo steamer and proof for 30 - 40 mins until doubled in size
16.  Use medium heat with cool water for 20 mins
17.  Rest for 5 mins before open the lid
18.  Cut the bottom of the steam bun and slot in the stem

完成了It's done !
效果不錯!The look is not bad!


請訂閱[懶媽媽開飯啦!的頻道 , Please subscribe [Lazy Mom Cookbook] channel :- 


Saturday, 4 November 2017

彩糖牛油曲奇餅 Funfetti Butter Cookies

彩糖牛油曲奇餅 - 簡單做法 (免機打)
How to Make Funfetti  Butter Cookies - Easy Recipe (No mixer)

這曲奇餅非常簡單易做,就和小朋友起上一堂親子課,來試做這個彩糖曲奇餅吧!
An easy way to make cookies. Let's make some together with your kids!


YouTube Video視頻:
 
 
材料 :-

蛋一隻
120g 無鹽牛油(奶油) (黃油)
110g 細砂糖
150g 中筋面粉
1/2 茶匙蘇打粉
1/4 茶匙鹽
湯匙彩糖


Ingredients:- 

1 Egg
120g Unsalted Butter
110g Caster Sugar
150g Plain Flour
1/2 Bicarbonate Soda
1/4 Tsp Salt
1 Tbsp Sprinkles 


做法: 
1.  用微波爐熔化牛油
2.  冷卻5 分鐘


3.  牛油加入蛋和糖拌勻

 
4.  把粉, 蘇打粉和鹽篩入粉攪拌均匀


5.  加入彩糖拌


6.  蓋上保鮮膜放入冰箱 15分鐘

 
7.  預熱焗爐180°C
8.  把粉糊做成球状
9.  放在烤盆上

 
10.  再加點彩糖

 
11.  用180°C 13 - 15分鐘
  **烘焙的時間和度數視乎不同牌子和類型的烤爐


12.  非常簡單易做, 完成了!!


Methods: 
1.  Use microwave to melt the butter
2.  Cool down for 5 mins
3.  Add egg and sugar into the butter and stir
4.  Sift the flour, bicarbonate soda and salt into the batter
5.  Mix with the sprinkles
6.  Wrap and put into the fridge for 15 mins
7.  Preheat the oven at 180°C
8.  Scoop the mixture to round shape
9.  Put on the baking pan
10.  Top off with some extra sprinkles
11.  Bake at 180°C for 13 - 15 mins
12.  Baking time and degree may vary from the brand and type of your oven
13.  Easy and simple , it's done!!


請訂閱[懶媽媽開飯啦!的頻道 , Please subscribe [Lazy Mom Cookbook] channel :- 


Friday, 20 October 2017

巧克力斑馬紋蛋糕 How to Make Chocolate Zebra Cake

做這個斑馬紋蛋糕覺得十分有趣,两種顏色交替,每次做出來的斑紋也會不一樣!
It's so fun to make this zebra cake, every time the two alternate colours strips will never have the pattern!


YouTube Video視頻


材料 :-

雞蛋四隻
100g低筋面粉
40g無鹽牛油(奶油)
80g 細砂糖
45ml 牛奶
1/2 茶匙香草精
1/2 茶匙檸檬汁(或塔塔粉)
一湯匙可可粉


Ingredients:

4 Eggs
100g Cake Flour
40g Unsalted Butter
80g Caster Sugar
45ml Milk
1/2 Tsp Vanilla Extract
1/2 Tsp Lemon Juice (or Cream of Tartar)
1 Tbsp Cocoa Powder


做法:

1. 用6寸的蛋糕摸
2. 如果蛋糕盤的底部是可取出的, 用鋁紙把蛋糕摸底包起
3. 放入烤盤紙 


4. 分開蛋黄和蛋白


5. 蛋黄加入溶好的牛油,牛奶和香草精拌匀


6. 把粉篩入蛋黃糊


7. 攪拌均匀備用


8. 蛋白加入檸檬汁


9. 糖分三次加入蛋白和用高速打發


10. 打發至有光澤出現尖勾(乾性發泡)


11. 把一些蛋白霜加入蛋黄糊中混合均匀


12. 再把蛋黄糊倒入蛋白霜中


13. 混合均匀至麵糊看不見蛋面霜


14. 將麵糊分成兩份


15. 預熱焗爐160°C
16. 一份篩入可可粉攪拌均匀


17. 把兩種麵糊輪流放入蛋糕摸


18. 加入熱水在比較大的盆中或焗盤中 (水浴法)


19. 用160°C 焗 60 - 65 分鐘
      **烘焙的時間和度數視乎不同牌子和類型的烤爐


20. 蛋糕冷卻後會稍為收縮

21. 待放凉後把糖霜篩在蛋糕面


Methods:

1. Use 6 inches cake pan
2. If the cake pan with removable base, use a piece of aluminium foil to wrap the bottom of the cake pan
3. Line with baking paper
4. Separate the egg whites and egg yolks
5. Add and mix melted butter, milk and vanilla extract
6. Sift the flour into the egg yolk batter
7. Mix well and set aside for later use
8. Add lemon juice into the egg whites
9. Add 1/3 sugar into the egg whites each time and whisk at high speed
Whisk till stiff peak stage
10. Add some of the meringue to the egg yolk batter and stir and mix well
11. And pour the egg yolk batter into the meringue
12. Fold to mix the batter until no lump remains
13. Divide the batter into two portions
14. Preheat the oven to 160°C
15. Sift cocoa powder into one of the portion and mix well
16. Scoop the two batters alternatively into the cake pan
17. Add hot water into a bigger pan or baking tray (water bath method)
18. Bake at 160°C for 60 - 65 mins
      **Baking time and degree may vary from the brand and type of your oven

19. The cake will shrink slightly after it cooled
20. Sift the icing sugar on top of the cake after it cooled


請訂閱[懶媽媽開飯啦!的頻道 , Please subscribe [Lazy Mom Cookbook] channel :-